Pages

Friday, April 27, 2012

DiY: Urban Outfitters Inspired Magazine Boxes

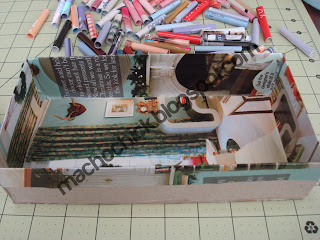
I've been holding this project for a long time, and yesterday I'm feeling creative, so I decided to make this (finally!) boxes with rolled-up magazines. I saw the item at Urban Outfitters a long time ago (like the pic below) and I've seen some video tutorials on you tube and I wanted to try it, but haven't got the time. 
~ Urban Outfitter's Rolled Up Magazine Rack ~
Luckily, I got a lot of free time yesterday and went for it! It's bit tedious, but I'm happy with the outcome! Here's what you'll need:

  • Empty Cereal Boxes (or any sturdy old boxes you have)
  • Old Magazines
  • Cutting Mat (or do it on glass table or use anything that can protect the surface when you're cutting)
  • Roller Cutter (or box cutter or scissors - whatever you have available)
  • Glue
  • Glue Gun and Glue sticks

Step-By-Step:
1) Measure the box that you want to make and cut your cereal box based on your measurements. Glue them together using the Glue Gun. Here I measured: 9" x 4" x 2":
2) Cut out magazine strips vertically. Measure the sides of your box and that should will be the width of your  strips, don't worry about the length as you're going to roll it up. Here I made 2" width based on the sides of my box.
 3) Using a pencil. Roll the strips. If you want smaller rolls, you can use thinner pencils, pen or brush.
 * Make sure the outer ends of your strip have colors on it, or it will end up all white, if that is the color you wanted, then it's okay. But for me, I prefer colored.
 4) When you get to the end, use a regular glue to bond it.
 5) Take out the rolled piece. Make sure the ends are straight too. It takes practice but it's not that hard.
 6) Make several pieces. As you can see here, all my rolled-up strips have colors in them. I chose the pages where it has colors in the end so it'll look nicer. Also, make sure you have enough strips to cover the whole sides of the box.
 7) When you're done with the strips, cover the inside of the box with a magazine page that you like. It doesn't matter if you don't cover all the area on the sides, because you're going to cover it with the strips anyway. I use a regular glue on this one.
 8) After covering the box, you can now stick the rolled-up strips with a glue gun. Stick them side by side. Don't forget to glue the sides to make it sturdy.
 9) Just continue gluing them together until you covered the whole side of the box.
 10) Done!
 I can now use it to organize my sewing materials.
 I also made a smaller one to put my pins in. This time, I designed it with color gradation.
Hope you enjoy my tutorial and let me know if you made something similar too! 
Thanks for reading!

Wednesday, April 25, 2012

Food Place: A Visit at Bev Mo!

I drink alcohol occasionally and I think I've been sober for 3 months now. I usually drink beer, daiquiris and margaritas...but never wine. So this is my first time to try one. My friend from Amsterdam recommended me two that she likes, but I couldn't find it here. The SA (Sales Associate) recommended the closest he can find, so I'll settle for that. I forgot the name, and it's currently being chilled so I got no pictures yet and I can't say if I like it or not.

I also found this two interesting and took pictures, maybe I'll try these next time:


Saturday, April 21, 2012

Arts: DIY Mini Munny World

It's been a while before I started to do DIY toys again. A friend asked me to do a customized toy for her brother's birthday, good timing because Kidrobot are having their BOGO 50% off, so I got some extras:
DIY Mini Munny World Haul
 I was at home that day and I saw how this was literally DROPPED off by UPS carrier on my doorstep. The delivery gal just dropped it there like a sack of potatoes (it's not even that heavy!). What if it's fragile? I remembered the news where the FedEx Guy delivered...oh threw...the flat screen TV over the fence. It really happens. You guys should be thankful you have jobs!!! If you don't want it, then give it to those you need them! Sorry I'm ranting out a bit here. 
"hmm... a crumpled sandwich bag?"
But anyway, good thing it's not fragile and it arrived safe and didn't get lost. That would be a total bummer for me.
yeyah!
 This is one of my favorite DIY that I gave to one of my friends for his birthday:
Tuan Ninja
I'll post my step-by-step soon! Ciao!

Sunday, April 8, 2012

Easter Eggs


Happy Easter everyone!
I decided to make Easter Eggs today! I woke up very early for this :) I really had fun making them! It's been a while since I held a brush. It's a nice feeling to paint again, even if it's just on eggs and won't last long because they'll be eaten! :)

Thursday, April 5, 2012

Food Place: Continental Gourmet


My DH knows how much I love my empanadas, and since moving to LA I haven't eaten a single one for 5 years! I'm so happy when he found a deli where they make these authentic and they were also featured in Food Network! Triple bonus!
We got 3 chicken, and 3 beef.
You order them by the deli inside the store and they will cook it for you. When they are busy it will take about 15 mins to cook. But since we went there in a slow day, we got it in about less than 10 mins.
They will get and use the meat they're also selling in their store by the meat / produce area, and you'll see them cook it for you.
So it's steaming hot when we ate them, it's so fresh and so goood!